Quick Launch Toolbar is one of the most indispensable feature for most Windows user. It gives instant access to many programs and folders.
Many users are habituated to it from older versions of Windows, which makes it difficult for them to adjust with the absence of Quick Launch Toolbar in Windows 7.
Quick Launch Toolbar is disabled/hidden by default in Windows 7, but can be enabled using the following steps.
- Open the Run dialog from Start > Run or press [Win] + [R]. Type gpedit.msc and press Enter. Local Group Policy Editor will open up.
- On the left-hand panel, navigate to User Configuration > Administrative Templates > Start Menu and Taskbar option. A list of settings will open in the right-hand panel. Search for a setting labeled Show QuickLaunch on Taskbar and double-click it.

- Select Enabled and click Apply > OK. Close the Local Group Policy Editor window.
- Right-click on the Taskbar and select Toolbars > New toolbar.
- Navigate to C:\Users\<user>\AppData\Roaming\Microsoft\Internet Explorer (the folder AppData maybe hidden – unhide it and proceed with navigation). Select Quick Launch folder and click Select Folder.
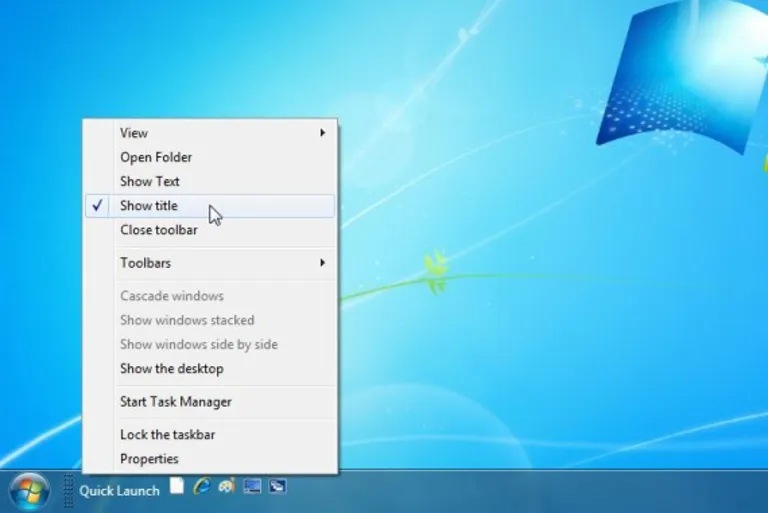
You will probably see Quick Launch toolbar appear on the right-side of the Taskbar. To customize it more for usability, right-click on the Taskbar and uncheck Lock the taskbar option. Adjust the toolbar as per your need. Right-click on the Quick Launch toolbar and uncheck two options – Show Text and Show Title. For a more compact look, you can right-click and select View > Small Icons. Lock the taskbar again.
![]()
You can adjust the icons within the Quick Launch toolbar as per your need. So, are you happy to restore your Quick Launch toolbar in Windows 7?