Windows media player is a prominent player that operates on Microsoft based PCs. This player supports multiple formats and includes its own format made precisely for the player: Windows Media Audio, which operates with the (.wma) extension. While the quality of the sound is decent; the format is not generally compatible in most kinds of music players. Therefore converting it to the more largely used MP3 format is much easier especially when the audio is required for an independent portable audio player. MP3 is one of the most compatible formats still being utilized at present and gives the user a comparatively space efficient way to store music. You will not need an extra converter if you are currently utilizing Windows Media Player. It offers a conversion tool to make the process fairly straightforward. However, if you are using a different operating system then you may need to search online for an appropriate converter. Despite this conversion should not be hard with most of the programs that are created for this objective. In general they are not difficult to use and will perform the process just as efficiently. In this guide Windows Media Player will be used to perform the conversion.
1. To begin load Windows Media Player.
2. Go to the [Library] tab and select [Playlists] from this menu found on the left.
3. Choose the [Create Playlist] option and then enter the name for your playlist and depress the enter button on your computer.
4. You may now start to browse the computer for WMA files. When you have found the files you would like to open, use the [Shift] button located at either side of the letters on your keyboard to choose each file to be used.
5. When you have selected all the files remove your hands from the [Shift] button and drag the files that you have selected to the panel to your right, which will be clearly labelled [Drag items here to add them to your new playlists].
6. Place you blank CD in the empty CD ROM.
7. Choose the [Burn] tab and make certain that the [Audio CD] option is selected. Then you will need to click [Burn “your playlist name”] to drive. You will not need to worry that you may not realize when the process is complete, the CD should instantly be ejected from the drive when completed.
8. When the CD is bunt it will eject as said previously return it to the drive and prevent it from playing.
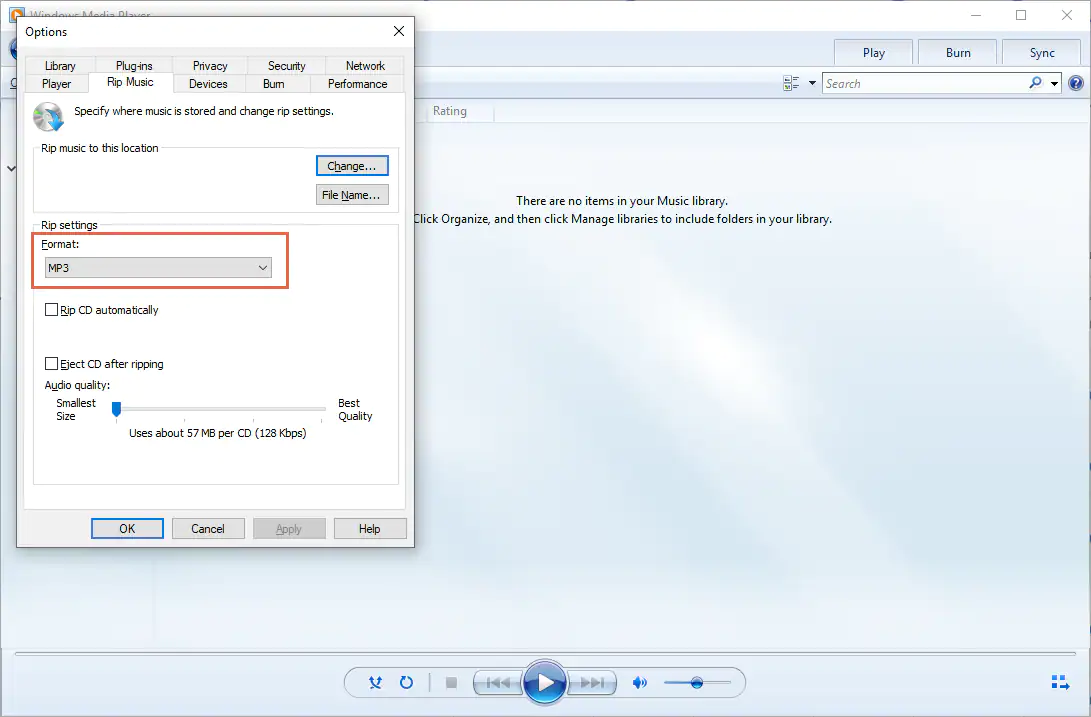
9. Now you will go to the [Rip] tab, select the [More Options] and select MP3 as the new output file. You may alter the destination folder or try to commit to memory the default folder where it will be stored.
10. When you have chosen all the files you may re-enter the [Rip] tab and select [Rip “CD Name”].
11. Once it is completed go to the folder where it is saved and then playback to make sure it was completed properly.